How Users Sign up for Subscriptions
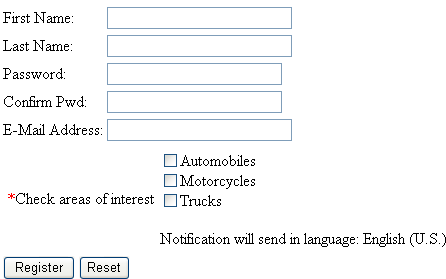
Once subscriptions are set up, you create a page on your Web site to let site visitors subscribe to areas of interest. An example of that page is below.
Note: The email address collected on the screen is used for the membership Username field.

To place this form on a Web page, your developer inserts a Membership Server Control. See Also: Membership Server Control
Any user who subscribes via the above screen becomes an Ektron CMS400.NET membership user, and is automatically added to the All Members user group. For more information, see Membership Users and Groups.
What happens next depends on the Enable Verify email check box in the Application Setup screen (shown below).

This topic is explained through the following subtopics.
What Happens if Verification email is Not Used
If the Enable Verify email checkbox is not checked, everyone who signs up automatically becomes a membership user.
What Happens if Verification email is Used
Warning! When using the Checkout Server Control on an eCommerce site, the Enable Verify Email setting must be unchecked. Otherwise, new users will receive an error message when they sign-up using this control. See Also: Checkout Server Control
Typically, when managing a self-subscribe list, you want new users to confirm their interest in being on the list. This prevents people from being subscribed by someone else without their permission.
If the Enable Verify email checkbox is checked, everyone who signs up is placed on the Users Not Verified list. (To see this list, go to Workarea > Settings > Community Management > Memberships > Users Not Verified.)
These people then receive an email. You define the content of this email in Workarea > Settings > Community Management > Messages. The email should direct the unverified user to a new Web page that asks him to confirm his interest in signing up for the subscription. (See The Verification Message.) New users are activated when the subscriber confirms his interest.
To create such a page, your Web developer creates or updates a Web Form using the Membership Server Control. For this purpose, set the control’s DisplayMode property to AccountActivate.
Note: Users can also be manually activated or removed via the View Not Verified Users screen. For more information, see The View Not Verified Users Screen.
The Verification Message
By default, Ektron CMS400.NET supplies a generic message asking the user to confirm his password and directing him to the acitvatemyaccount.aspx page on your Web site. If you want to customize that message, follow these steps.
1. Go to Workarea > Settings > Community Management > Messages.
2. Click Add ( ).
).
3. Assign a title to the message, such as Verification Message.
4. Click to place a check mark in the Default box.
5. Enter the text of the confirmation message you want the subscriber to receive. Be sure to place the @appQueryLink@ variable in the message to create a link to the confirmation page. For example:
Welcome to example.com. You have registered to be notified of updates to our site.
Before we can do this, you need to activate your account. To do so, please visit @appQueryLink@.
The @appQueryLink@ variable places a link in the message that gets resolved as follows:
http://sitepath/workarea/activateuser.aspx?uid=[username]&acc=[accountID]
For example:
http://www.example.com/Workarea/[email protected]&acc=ce5w84o936477
The following table lists all variables that may be placed in the confirmation message.
|
Variable |
Retrieves this Membership user information |
| @appEmail@ | email address |
| @appActivateId@ | Account ID |
| @appUserName@ | UserName |
| @appFirstName@ | First name |
| @appLastName@ | Last name |
| @appDisplayName@ | Display name |
| @appAvatar@ | Avatar |
| @appSignature@ | Signature |
The View Not Verified Users Screen
All users who have signed up for a subscription but who have not yet verified that subscription appear on the View Not Verified Users Screen. This screen is available via Settings > Community Management > Memberships > Users not Verified.
After viewing membership users on the screen, you can manually activate their account. To do so, selecting one or more users then click Activate (
 ).
).
Note: The ek_PageSize setting in the web.config file determines the maximum number of users that can appear on a page before it “breaks.” When a page breaks, additional entries appear on another screen, and the following text appears near the bottom of the list:
Page 1 of 2[First Page] [Previous Page] [Next Page] [Last Page]
To select all members, click the check box in the header line, next to Username (circled below).

You can also change the way membership users are sorted, or use the Search button to find users that match your criteria (for example, users whose username includes example.com.) These features are explained in Sorting Membership Users and Searching for Membership Users.
Setting up Other Web Pages for Site Visitor
You can set up other Web pages that let the subscriber perform the following actions:
Activate their account
Reset their password
Unsubscribe
To create these pages on your web site, place the membership server control on the page. Then use the control’s DisplayMode property to determine the kind of screen you want to place. For example, to create a screen that lets the user reset his password, set the Membership server control’s DisplayMode property to ResetPassword.
For more information, see Membership Server Control.
CMS User Subscription Sign Up
CMS users can also subscribe to any subscription list. This would be particularly useful on an intranet where, for example, employees are notified when job-related information is updated.
Another example would be for your internet site. The manager of the Marketing Department could sign up to be notified whenever Marketing content is added or updated.
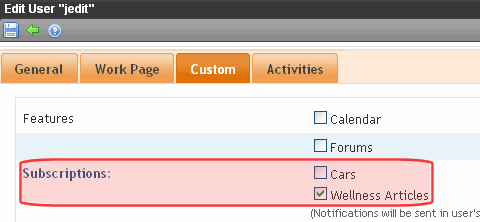
To do so, users go to Settings > Users > Edit User > Custom tab (see illustration).

